

Strood
On
3rd December 1860, the LC&DR commenced through running between Canterbury and
London Victoria, over a new direct line via Sole Street, St Mary Cray, and
Bromley. Consequently, passenger trains over the connecting spur between the
Medway Bridge and Strood station ceased to carry passenger services, but the
rails were retained. At this time, the LC&DR opened its own Strood station on
the then new line, immediately north of the junction with the NKL connecting
spur.
What of the connecting spur thereafter? Perhaps except for the occasional
freight service, very little for the next sixteen or so years. This situation
was then reversed when, in late 1876, the then Mayor of Rochester, Mr N. E.
Toomer, contested the absence of a railway service over this section. Under the
Regulation of Railways Act 1873, the Mayor brought his case to the Railway
Commissioners, the latter giving judgement on 6th January 1877. This compelled
both SER and LC&DR to run services over spur between each other’s networks.
Reportedly, the SER had proposed running coaches through to Chatham, only to be
opposed by the LC&DR – the latter no doubt remembered its rival’s lack of
co-operation in 1859. Passenger trains started running over the spur, which was
thereafter referred to as the ‘’Toomer Loop’’, on 1st April 1877. Passengers
could once again interchange between services for North West Kent and the Medway
Towns at the SER’s Strood, rather than walking between the latter and the
LC&DR’s station.
Not to be outdone by the LC&DR, the SER embarked on a belated attempt to serve
the Medway Towns by an expensive extension of the NKL over the river. This
became known as the ‘’Chatham Central’’ branch, 1-mile in length and
double-track throughout. For this, a completely separate steel lattice girder
bridge was built immediately northeast and parallel with the existing LC&DR
structure. It comprised brick and concrete piers aligned to those of the
existing LC&DR bridge, and had four spans ranging from 127-feet to 181-feet
6-inches in length. The former was also served by a new double-track incline
from the SER’s Strood station, which sat upon an embankment east of the Toomer
Loop. The first half mile of this branch opened on 20th July 1891 to a station
called ‘’Rochester Common’’, just half a mile from the proposed end of the
line. It was finally opened through to a terminus called ‘’Chatham Central’’ on
1st March 1892, coinciding with the opening of the LC&DR’s own Rochester station
immediately to the west.
The SER and LC&DR formed a joint managing committee and from 1st January 1899,
both came under the auspices of the ‘’South Eastern & Chatham Railway’’ (SE&CR).
This did not necessarily lead to the closure of duplicate lines, but in the
Medway Towns at least, the network was simplified. The SER’s ‘’Chatham Central’’
branch, which was carried upon a brick viaduct, was closed on 1st October 1911.
The demolition of the brick arches coincided with the enlargement of the LC&DR
Rochester station, this being increased from two to four platforms faces serving
an equal number of tracks. As part of the same works, the lattice bridge which
carried the Chatham Central branch was retained and the LC&DR line slewed over
to meet it. Thereafter, the SER span carried all rail traffic over the Medway,
rendering the LC&DR bridge and ‘’Toomer Loop’’ obsolete.
In the meantime, alterations had been carried out at Strood station. In 1878,
Stewart Brothers & Spencer started building an oil and seed mill southeast of
the station, along Canal Road. The mill came into use in 1880 and a connection
was made with the railway. This was via a miniature wagon turntable on the
‘’down’’ side of the line, immediately south of platform 1. This turntable was
served by a couple of short spurs which gave access to both the ‘’Toomer Loop’’
and, when it opened in 1891, the spur of the Chatham Central branch. The mill
burnt down on 9th November 1884, but was subsequently rebuilt and brought back
into use the following year.
Layout alterations also took place north of the station. In about 1895, a second
track was laid within the engine shed and the connection with the ‘’up’’ line
revised. The shed building could still only be reached by a headshunt manoeuvre,
but the points were moved southwards, so engines no longer had to run into the
tunnel first. A coal stage and new sidings were laid, and a larger 45-foot
turntable installed on a site south of the previous one. The headshunt was
extended up to the station platforms and a siding of similar length laid beside
it. After 1899, Strood and the ex-LC&DR shed at Gillingham came under the same
umbrella and shared the allocation code ‘’10’’.
As a World War I economy, the ex-LC&DR Strood station closed on 1st January 1917
– by this time, it was known as ‘’Rochester Bridge’’. This was followed on 29th
June 1919 by a fire breaking out on the SER bridge, which damaged the
structure’s timber decking. As a result, the original LC&DR bridge and the
Toomer Loop were swiftly brought back into action. Over the next three years,
repair and strengthening works were undertaken on the SER bridge by the
‘’Cleveland Bridge Company’’, and it re-opened to rail traffic on 8th January
1922. The ex-LC&DR span and the Toomer Loop again went out of use, this time
permanently. After the junction with the ex-LC&DR main line and the Toomer Loop
was taken out of use, the latter was used for rolling stock storage. It was
joined by an additional pair of sidings laid on the ‘’down’’ side at Strood,
parallel with the departing Medway Valley Line.
1970
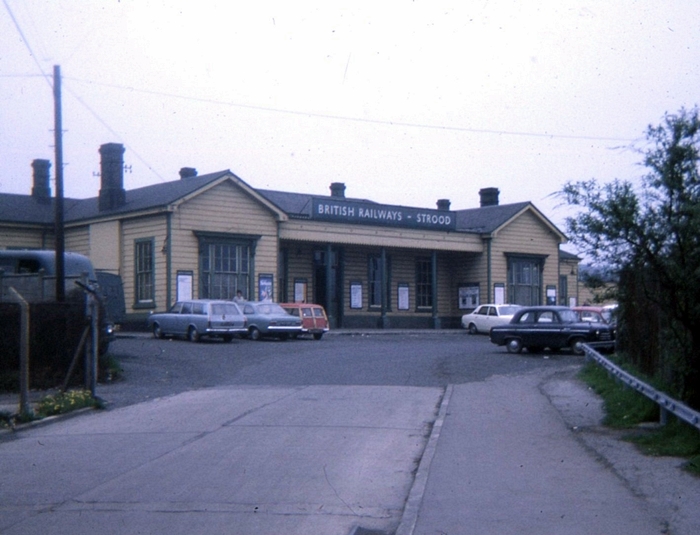
The vintage SER timber main building, located on the ''down'' side, was a spacious affair which boasted a symmetrical façade. Sash-style windows and a tidy forecourt canopy are in evidence. The building was flattened three years latter and replaced by a dreary CLASP fabrication. © Roger Goodrum
1970

The elevated ''Chatham'' main line can be seen in the background of this south-westerly view from the ''down'' platform. The platform canopies date from the final years of the SE&CR, sporting the trademark valance design of the time. Prior to this, flat-roofed canopies were in use, these of which lacked valances of any description. Notice also the BR ''Sausage'' Totem affixed to the lamppost on the right, and the staff track
crossing between the platforms. © Roger Goodrum
1970
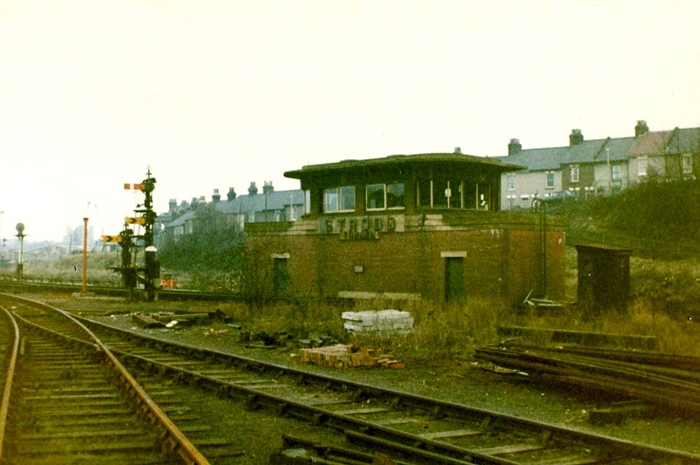
Strood Tunnel signal box opened in conjunction with the 1939 Gillingham electrification, and was built to the SR's ''Glasshouse'' design. The double-track North Kent Line ran between the cabin and semaphore signal posts, the latter two going out of use on 17th October 1971. The track in the foreground once formed part of a maze of lines around Strood Dock, and was still in place fifteen years later. © Roger Goodrum
1970
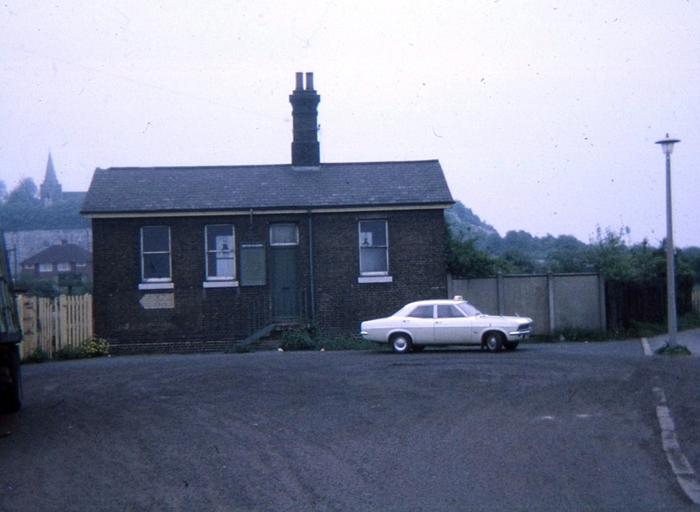
This was Strood Dock goods yard office, which was located at the end of the 540-yard-long Canal Road, beside the basin. The chalk ridge, whence the previous photograph was taken, can seen seen in the distance. A Vauxhall Viva completes this bygone scene. © Roger Goodrum
<< Previous Next: The History Continues >>
Return to the Kent Rail Homepage or alternatively, check for Updates.
Website & Copyright information - Links - Contact the Webmaster
All content is copyright © David Glasspool unless otherwise stated